Klimaanlagen Fensteradapter

Projekte

Projects

Klimaanlagen Fensteradapter

Air Conditioning Window Adapter

08.2020

Überblick

Overview
Geplantes Budget
planed budget
0
Fortschritt
progress

Design

Prepare

Build

Test

Done!

Maschienen und Werkzeuge
Machines and tools
Druckzeit ca. 7h 30min / benutztes Filament: 74g PLA  <=> ~1,85€

Bei über 30°C ist eine Klimaanlage ein Segen. Die warme Abluft muss über eine Rohr nach draußen abgeführt werden. Leider hat unsere Klimaanlage wie vermutlich viele andere auch nur einen Adapter für US Amerikanische Fenster. Dumm nur wenn man ein erste Welt Fenster hat und keine gute Möglichkeit hat, das Abluftrohr am Fenster anzubringen. Glücklicherweise habe ich für das Schlafzimmerfenster, als Mückenschutz und Absturzsicherung für unsere Katzen einen Holzrahmen mit bespanntem Hasendraht und Fliegengitter gebaut, an dem ein eigener Adapter befestigt werden kann.

Für die Maße des Adapters habe ich eine schnelle Handskizze gemacht. In Rhino habe ich das Modell gebaut wo ich aber leider die Rastschlitze falsch gesetzt habe. Diese musste ich dann nach dem 3D Druck nacharbeiten. Das CAD Modell im Download bereich ist aber überarbeitet.

Der Adapter ist für eine „Suntec“ Klimaanlage passend und kann sowohl hochkant als auch waagerecht festgeschraubt werden. Dafür sind Senkungen sowohl auf der Vorder- als auch auf der Rückseite. Im Video sieht man, dass ich mich zuerst für ein symmetrisches Design entschieden habe, habe dann aber des 3D Drucks wegen eine Seite Glatt gemacht.

Leider muss das Fenster weiterhin ganz oder teilweise geöffnet bleiben, was die Effizienz nicht unbedingt begünstigt.

Print time approx. 7h 30min / used filament: 74g PLA  <=> ~1,85€

At over 30 °C, air conditioning is a blessing. The warm exhaust air must be discharged outside via a pipe. Unfortunately, like many others, our air conditioning only has an adapter for US American windows. It’s a pity if you have no first world window and so don’t have a good way of attaching the exhaust pipe to the window. Fortunately, for the bedroom window, as a mosquito repellent and fall protection for our cats, I built a wooden frame with harnessed rabbit wire and fly screen, to which a separate adapter can be attached.

For the dimensions of the adapter I made a quick hand sketch. I built the model in Rhino, but unfortunately I set the locking slots incorrectly. I then had to rework these after the 3D printing. The CAD model in the download area has been revised.

The adapter is suitable for a „Suntec“ air conditioning system and can be screwed on both vertically and horizontally. There are countersunk holes on the front as well as on the back. In the video you can see that I first opted for a symmetrical design, but then made one side smooth because of the 3D printing.

Unfortunately, the window still has to remain fully or partially open, which does not necessarily improve efficiency.

3D Model

3d model 3d model,blender,obj,3ds,maya,dxf,dae,stl,vrml,x3d,file by z9z1rc
     

Snapmaker erster 3D Druck

Projekte

Projects

Snapmaker erster 3D Druck

Snapmaker first 3D Print

08.2020

Überblick

Overview
Geplantes Budget
planed budget
~ 0
Fortschritt
progress

Design

Prepare

Build

Test

Done!

Maschienen und Werkzeuge
Machines and tools
Druckzeit ca. 3h / benutztes Filament: 29,8g PLA  <=> ~0,75€

Als erstes 3D gedrucktes Teil wollte ich etwas flaches drucken was schnell geht. Dummerweise hat es dann am Ende doch 3 Stunden gedauert.

Das Modell ist von der Plattform thingiverse.com wo es für alles Mögliche 3D druckbare Modelle gibt. Das Model ist von dem User Bribro12.

Nach dem Umbau des Snapmakers wurde über das Panel, das „Auto Leveling“ ausgeführt um Unebenheiten im Druckbed digital auszugleichen. Um zu verhindern das sich das Model während des Druckens vom Druckbett löst, muss manuell ein Z Offset eingestellt werden sodass die erste gedruckte Schicht  optimal auf dem Druckbett haftet. Dazu wir normalerweise ein Blatt Papier unter die Düse gelegt und der Druckkopf soweit abgesengt, dass das Papier mit etwas Kraft zwischen Druckbett und Düse weggezogen werden kann.

Nun kann das Filament in den Druckkopf eingeführt werden. Dazu wird das „Hot End“ auf 200°C erhitzt und das Filament von oben zugeführt. Über die „load“ Funktion im Panel wird das Filament über Zahnräder zum „Hot End“ transportiert und geschmolzen.

Zuvor habe ich ein Stückchen aus einem Schwamm ausgeschnitten und durchstochen. Dann habe ich das Filament durch den Schwamm gesteckt, der verhindern soll, dass Staub und Schmutz die Düse verstopft.

Der G-Code für das Model wurde in Luban mit der Option „Schnelldruck“ erstellt. Dabei beträgt die Schichtdicke 0,24mm. Laut Luban soll der Druck 3 Stunden und 44 min dauern. In echt waren es soweit ich weiß nur etwas mehr als 3 Stunden. Es wurden für den Druck ca. 30g PLA Filament verbraucht was umgerechnet ca. 0,75€ Materialwert entspricht.

Nach dem Druck habe ich versucht über die biegsame Druckplatte den Druck abzulösen aber ohne Erfolg. Ich gehe davon aus das es besser klappt bei Dickeren und höheren Drucken, da diese Steifer sind und sich nicht mit der Platte verformen. So habe ich mit dem mitgelieferten Spatel den Druck nach und nach abgelösten. Was nur mit einem Messer ablösen konnte, war der sogenannte „skirt“ der vor dem Drucken um das Model gezogen wird. Er dient dazu erste Verunreinigungen durch degeneriertes Filament zu beseitigen und den Druckbereich optisch einzugrenzen. 

Degenerierter Kunststoff entsteht, wenn dieser zu lange unverarbeitet erhitz wird. Dabei zerfallen die Polymerstrukturen des Kunststoffs, verlieren dadurch ihre Eigenschaften und manche der Moleküle verbrennen in dem Zustand.

Nach dem Herauslösen und Zusammenstecken der Teile habe ich im Baumarkt etwas Schnur gekauft um das Katapult zu spannen. Das waren etwa 30cm. Getestet wurde das Katapult mit Katzen Leckerlies. Leider sind die Leckerlies im hohen bogen geflogen und sind er auf den Köpfen der Katzen gelandet als das sie danach hätten jagen können.

Print time approx. 3h / used filament: 29,8g PLA  <=> ~0,75€

As the first 3D printed part, I wanted to print something flat that could be done quickly. Unfortunately it took 3 hours in the end.

The model is from the platform thingiverse.com where there are 3D printable models for everything. The model is from the user Bribro12.

After the snapmaker had been converted, „Auto Leveling“ was carried out on the panel to digitally compensate for unevenness in the print bed. To prevent the model from becoming detached from the print bed during printing, a Z offset must be set manually so that the first printed layer adheres optimally to the print bed. To do this, we usually place a sheet of paper under the nozzle and lower the print head so that the paper can be pulled away between the print bed and nozzle with a little force.

The filament can now be inserted into the printhead. To do this, the „hot end“ is heated to 200 ° C and the filament is fed in from above. Using the „load“ function in the panel, the filament is transported to the „hot end“ via gear wheels and melted.

Before that, I cut a piece out of a sponge and pierced it. Then I put the filament through the sponge, which is supposed to keep dust and dirt from clogging the nozzle.

The G-code for the model was created in Luban with the „quick print“ option. The layer thickness is 0.24 mm. According to Luban, the print should take 3 hours and 44 minutes. As far as I know, it was only a little over 3 hours in real life. Approx. 30g of PLA filament were used for the print, which corresponds to approx. € 0.75 material value.

After printing, I tried to remove the print using the flexible printing plate, but without success. I assume that it works better with thicker and higher pressures, because these are stiffer and do not deform with the plate. So I gradually released the pressure with the supplied spatula. What could only be removed with a knife was the so-called „skirt“ which is pulled around the model before printing. It is used to remove the first impurities from degenerate filament and to optically limit the print area.

Degenerate plastic is created if it is heated for too long without being processed. The polymer structures of the plastic disintegrate, losing their properties and some of the molecules burn in this state.

After removing the parts and putting them together, I bought some string at the hardware store to tension the catapult. That was about 30cm. The catapult was tested with cat treats. Unfortunately the treats flew in a high arc and landed on the cats‘ heads when they could have hunted for them.

Snapmaker Laser Test

Projekte

Projects

Snapmaker Laser Test

Snapmaker Laser Test

08.2020

Überblick

Overview
Geplantes Budget
planed budget
0
Fortschritt
progress

Design

Prepare

Build

Test

Done!

Maschienen und Werkzeuge
Machines and tools

Um mich mit dem Laser vertraut zu machen habe ich ein paar Tests gemacht.

Schneiden

Anfangs ging ich noch davon aus das Luban nur Bilder verarbeiten kann und Schnitte nur durch tiefes Gravieren gemacht werden können. Nach erneuter Recherche im Internet habe ich dann herausgefunden, dass Luban Vektorpfade aus SVG Grafiken akzeptiert. Beim lasern hat man drei Optionen, Schwarz und Weiß, Graustufen und Überträger. Mit der Option „Überträger“ können jene Vektorpfade aus SVG Dateien verarbeitet werden.

Beim Schneiden kann man die Schnittgeschwindigkeit, die Leistung und die Anzahl der Durchgänge mit Z Zustellung einstellen. Da der Laser nur 1600mW Leistung hat, habe ich die Leistung immer auf 100%.

Der Versuch mit der blenden Form war sehr schlecht und hat das Material stark verbrannt. Grund dafür ist die viel zu langsame Schnittgeschwindigkeit (140mm/min). Basierend auf diesen Erkenntnissen habe ich die Schnittgeschwindigkeit signifikant erhöht.

Bei den drei Versuchen habe ich folgende Schnittwerte getestet.

erste Viereck: 400mm/min, 3x mit -0,5mm in Z

zweites Viereck: 600mm/min, 2x mit -0,5mm in Z

Portrait Oval: 500mm/min, 2x mit -0,7mm in Z

Dabei hat es nur beim ersten Versuch geklappt das 1,7mm Dicke Sperrholz (vermutlich Pappel) zu durchtrennen. Um Zeit zu sparen wollte ich in Versuch zwei nur 2 Durchgänge machen und die Schnittgeschwindigkeit erhöhen. Das hat aber nicht geklappt und so habe ich die Schnittgeschwindigkeit in Versuch drei wieder reduziert und die Z Zustellung etwas erhöht.

Wenn ich das gleiche Material erneut lasere werde ich die Werte des letzten Versuchs nehmen aber mit 400mm/min.

Gravur

Für das Gravieren habe ich die Option Graustufen gewählt und sowohl Kontrast als auch Helligkeit erhöht, da das Bild recht dunkel und auch kontrastarm ist. Da das zu lasernde Bild recht klein ist habe ich die Punktdichte auf 10 Punkte/mm erhöht. Bei größeren Bildern sollte die Punktdichte wohl verringert werde, da dies die Bearbeitungszeit unnötig erhöht und eine derart hoher Detailgrad nicht nötig ist. Als Algorithmus für die Bildverarbeitung habe ich „Atkinson“ gewählt. Die Leistung habe ich beim Gravieren auf 25% reduziert. Beim den aller ersten Gravierversuchen habe ich die Leistung schrittweise von 2%, auf 5% und dann auf 15% erhöht. Die Ergebnisse waren mit 15% aber nicht zufriedenstellend. Daher habe ich gleich bei 25% Leistung gestartet, was anscheinend genau richtig war.

Die Zeit für das Gravieren betrug ca. 45min.

To get used to the laser, I did a few tests.

Cutting

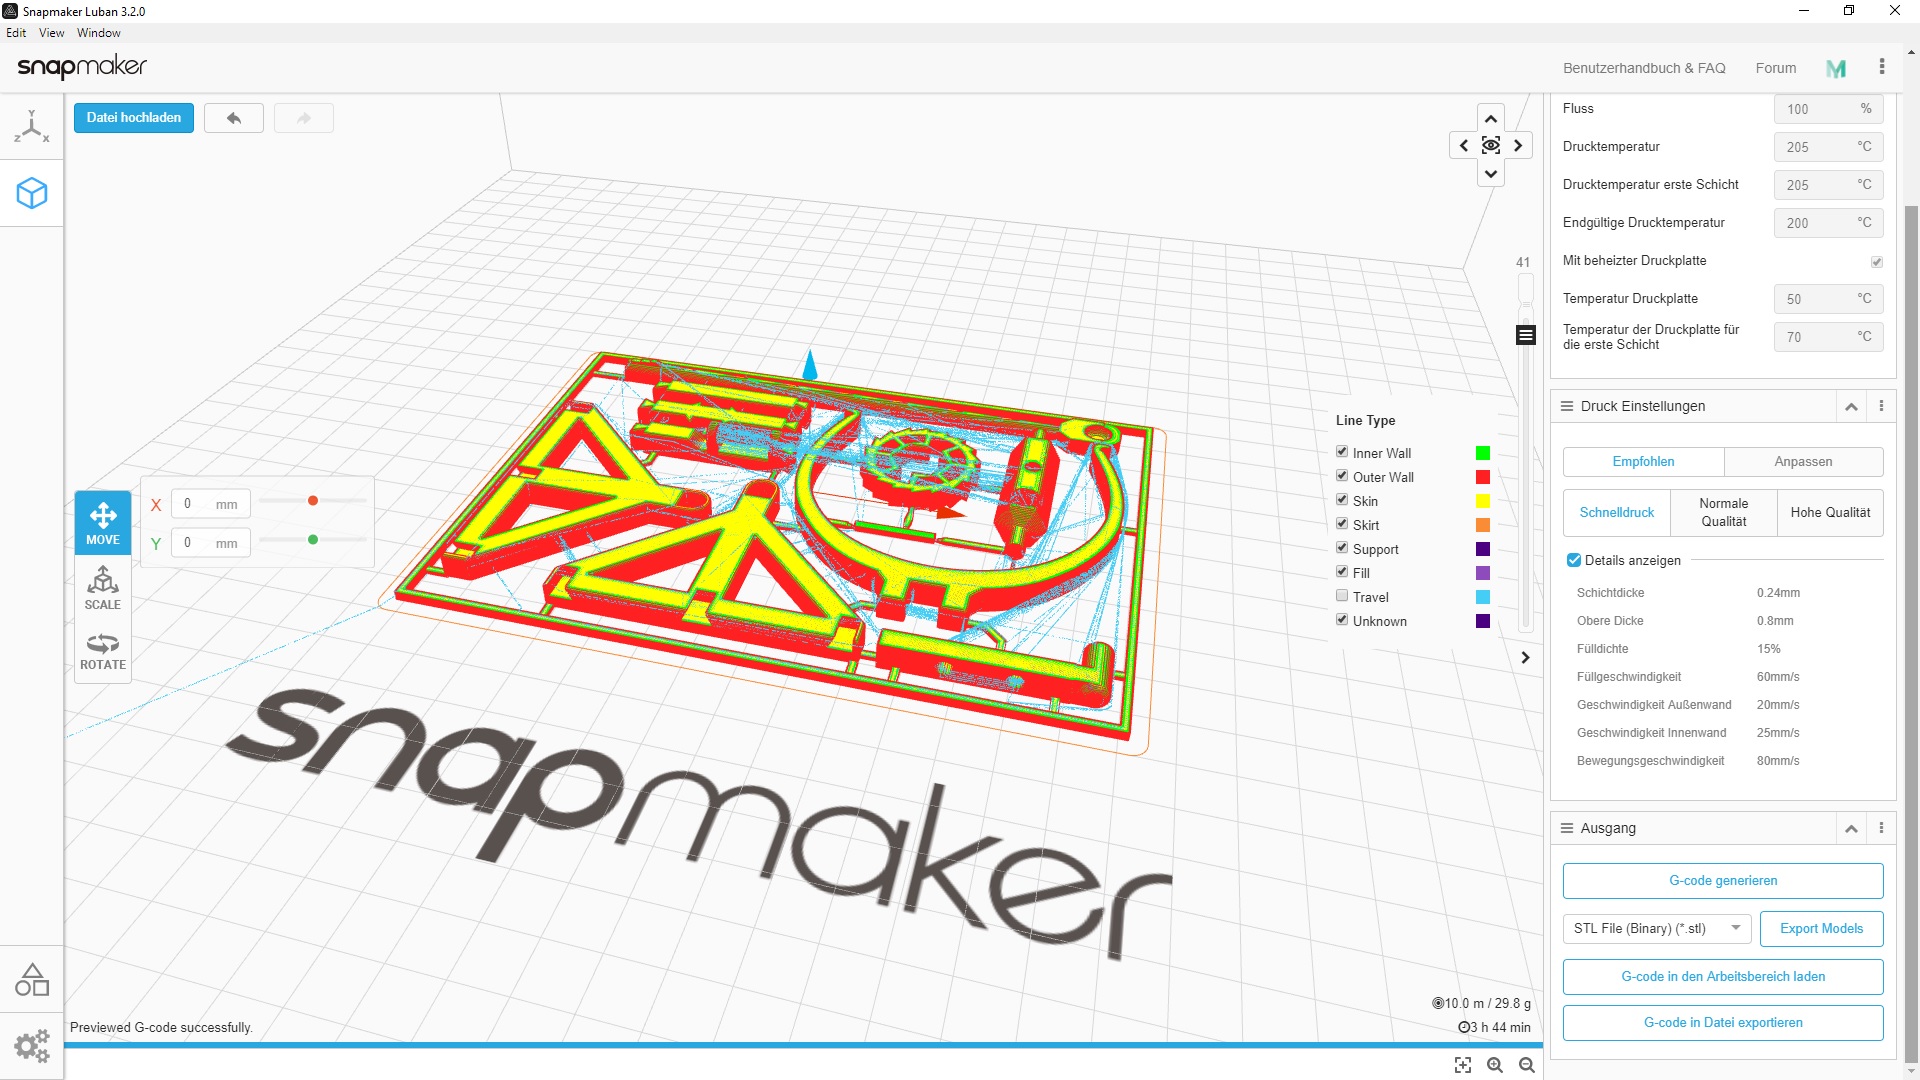
At first I assumed that Luban can only process images and that cuts can only be made by deep engraving. After researching the internet again, I found out that Luban accepts vector paths from SVG graphics. When it comes to lasering, you have three options, black and white, grayscale and carrier. With the option „Transmitter“ those vector paths from SVG files can be processed.

When cutting, you can set the cutting speed, the power and the number of passes with Z infeed. Since the laser only has 1600mW power, I always have the power at 100%.

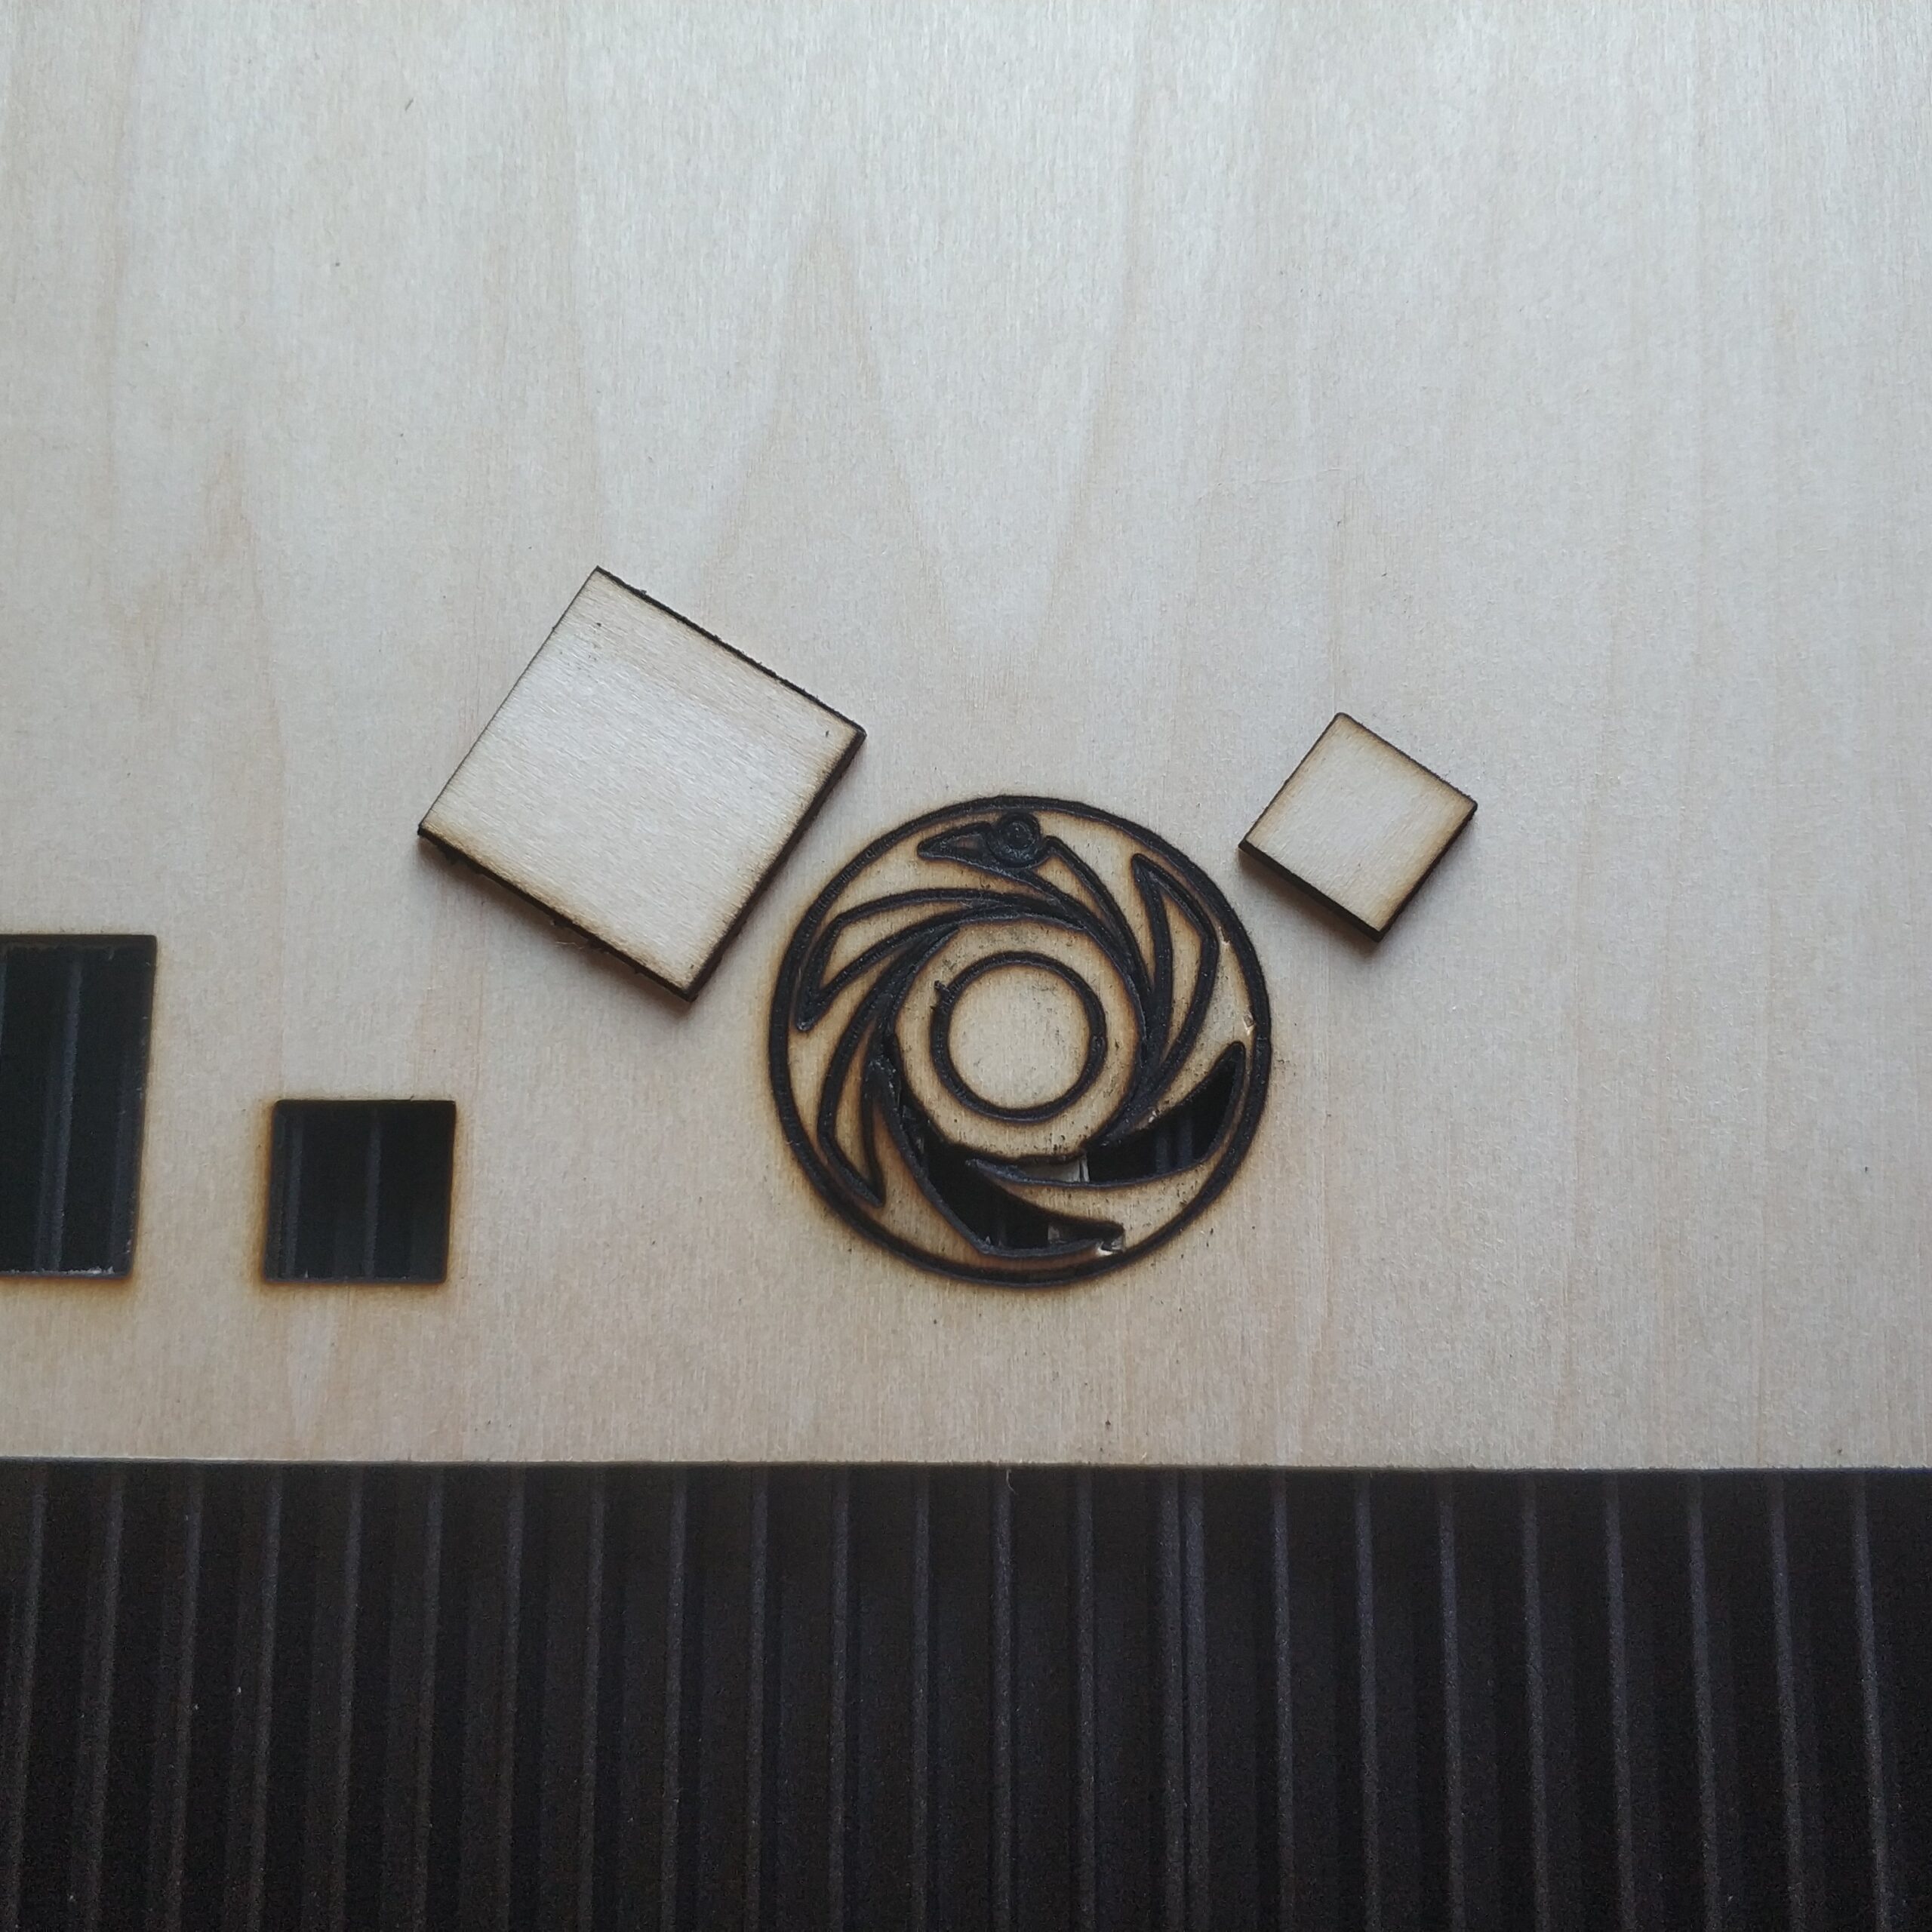
The attempt with the blind shape was very bad and burned the material badly. The reason for this is the much too slow cutting speed (140mm/min). Based on these findings, I significantly increased the cutting speed.

In the three attempts I tested the following cutting values.

first square: 400mm/min, 3x with -0.5mm in Z

second square: 600mm/min, 2x with -0.5mm in Z

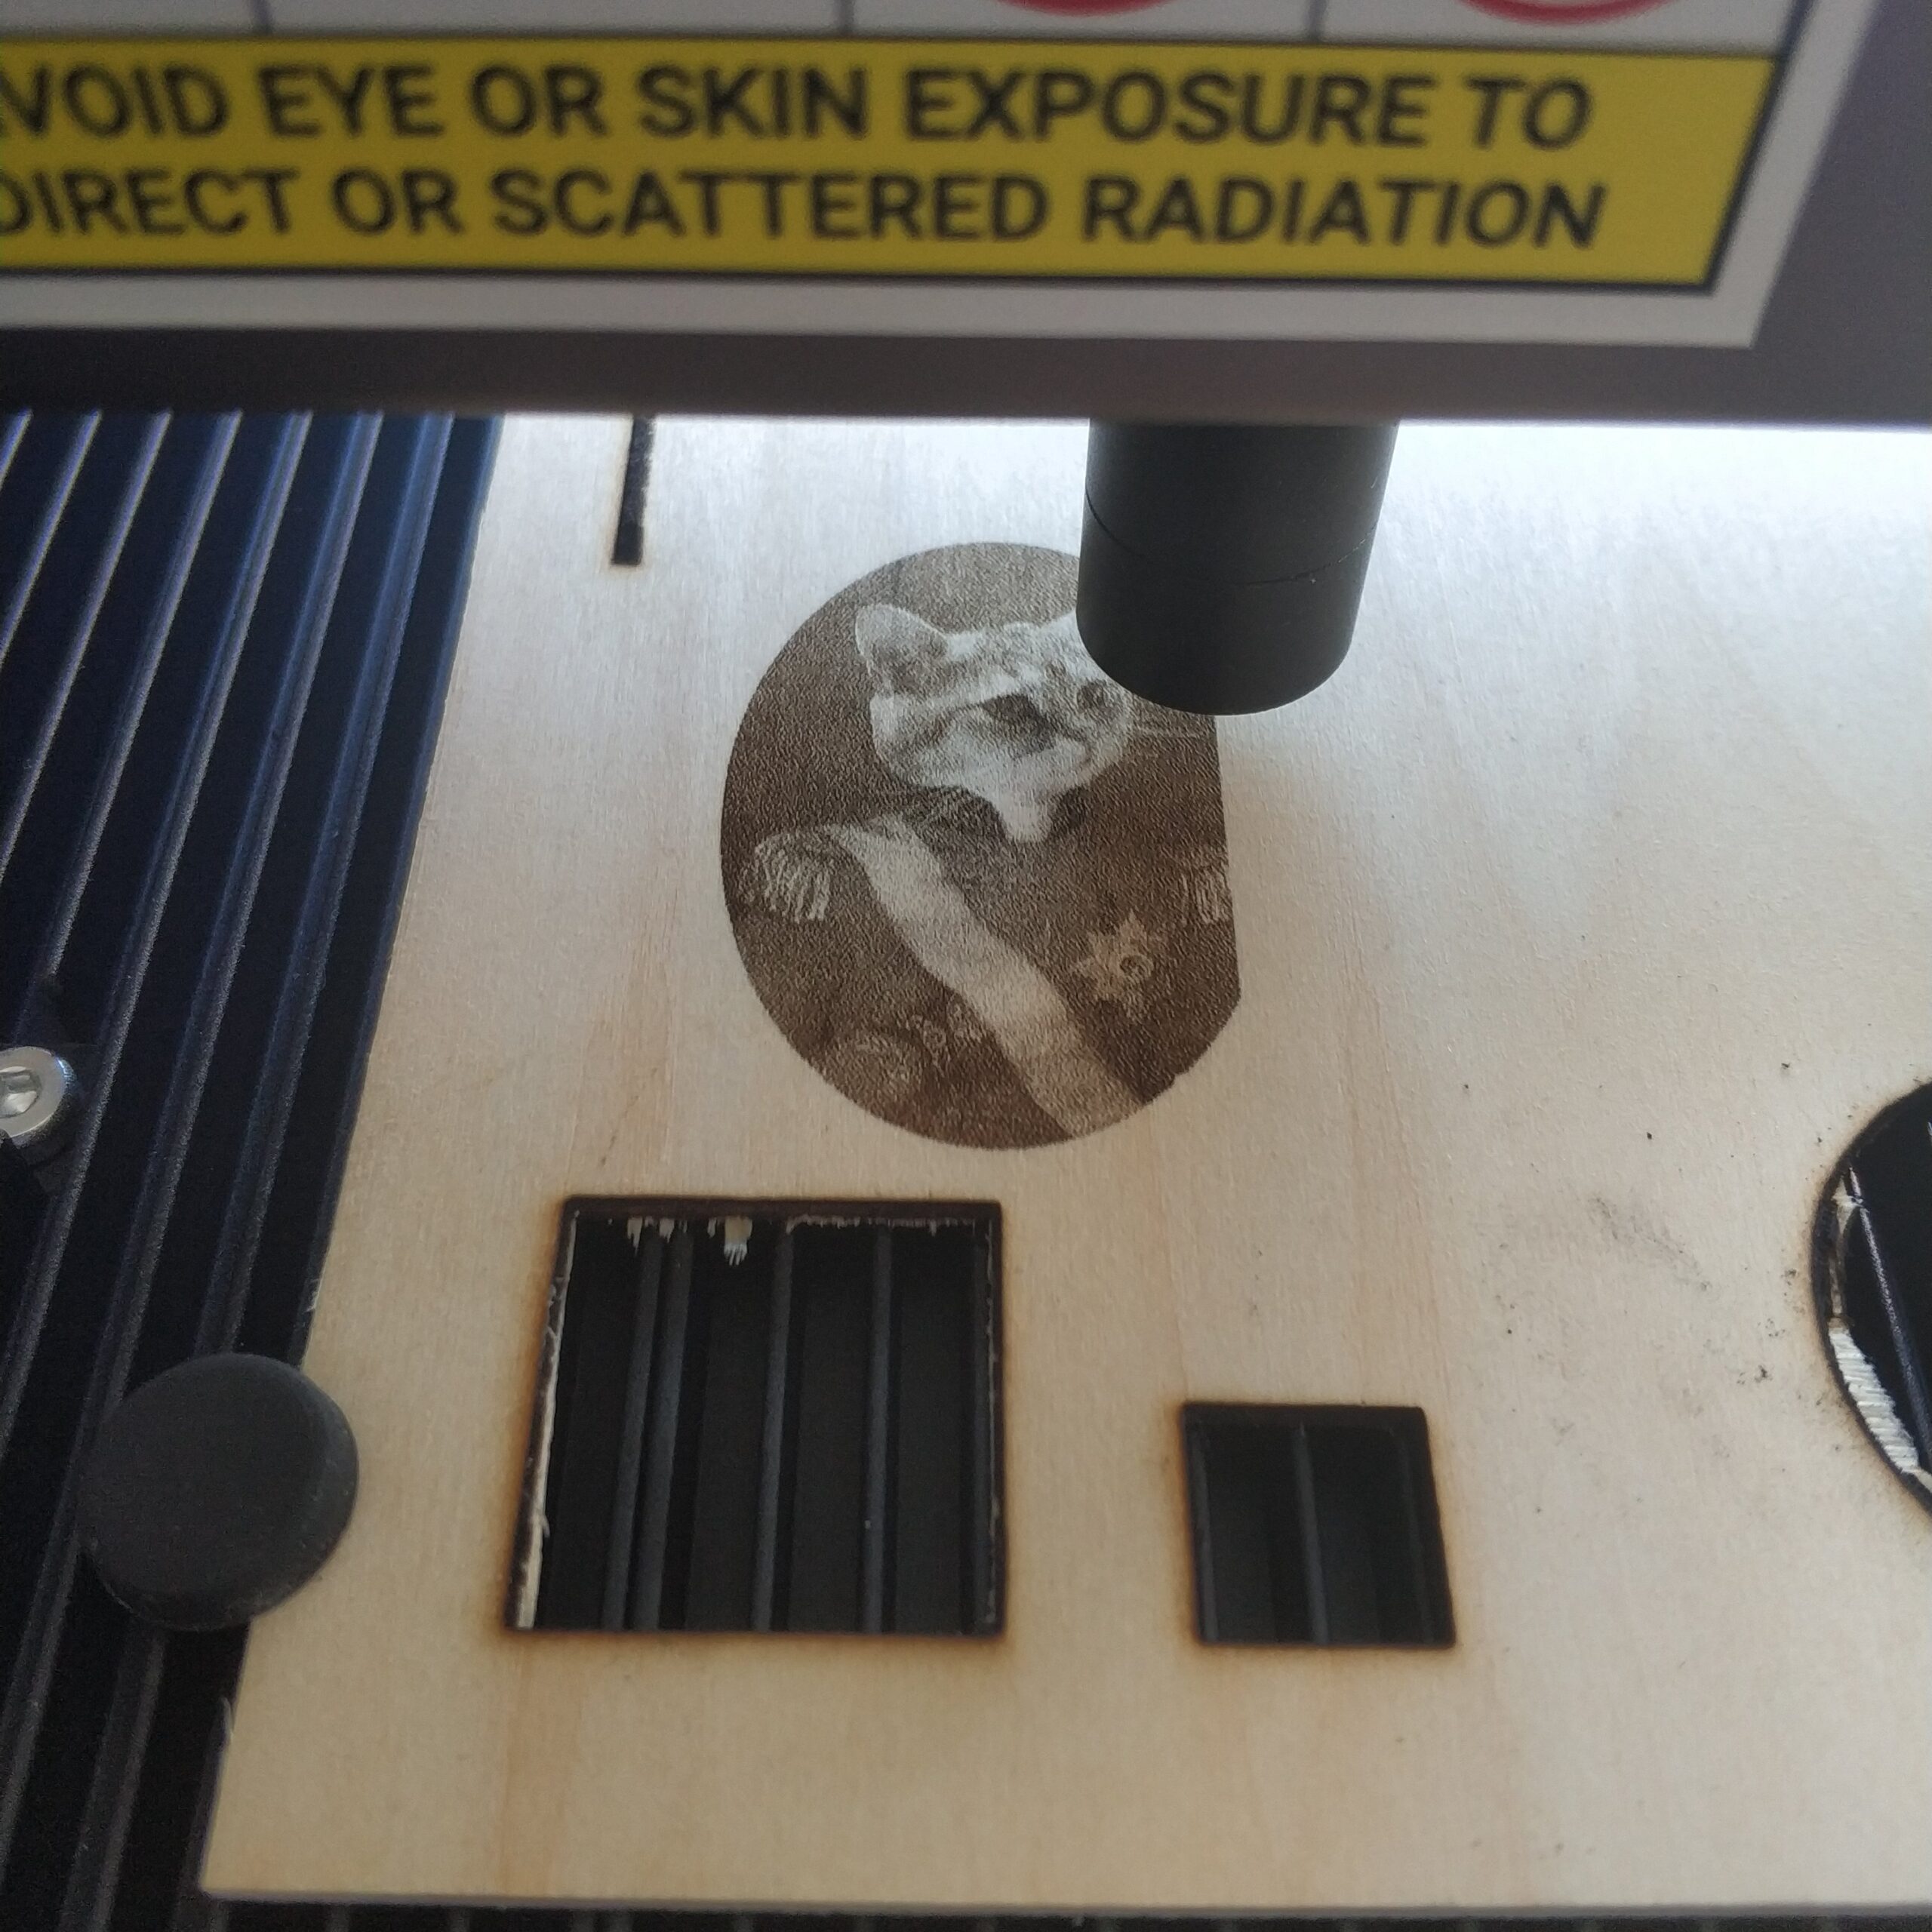
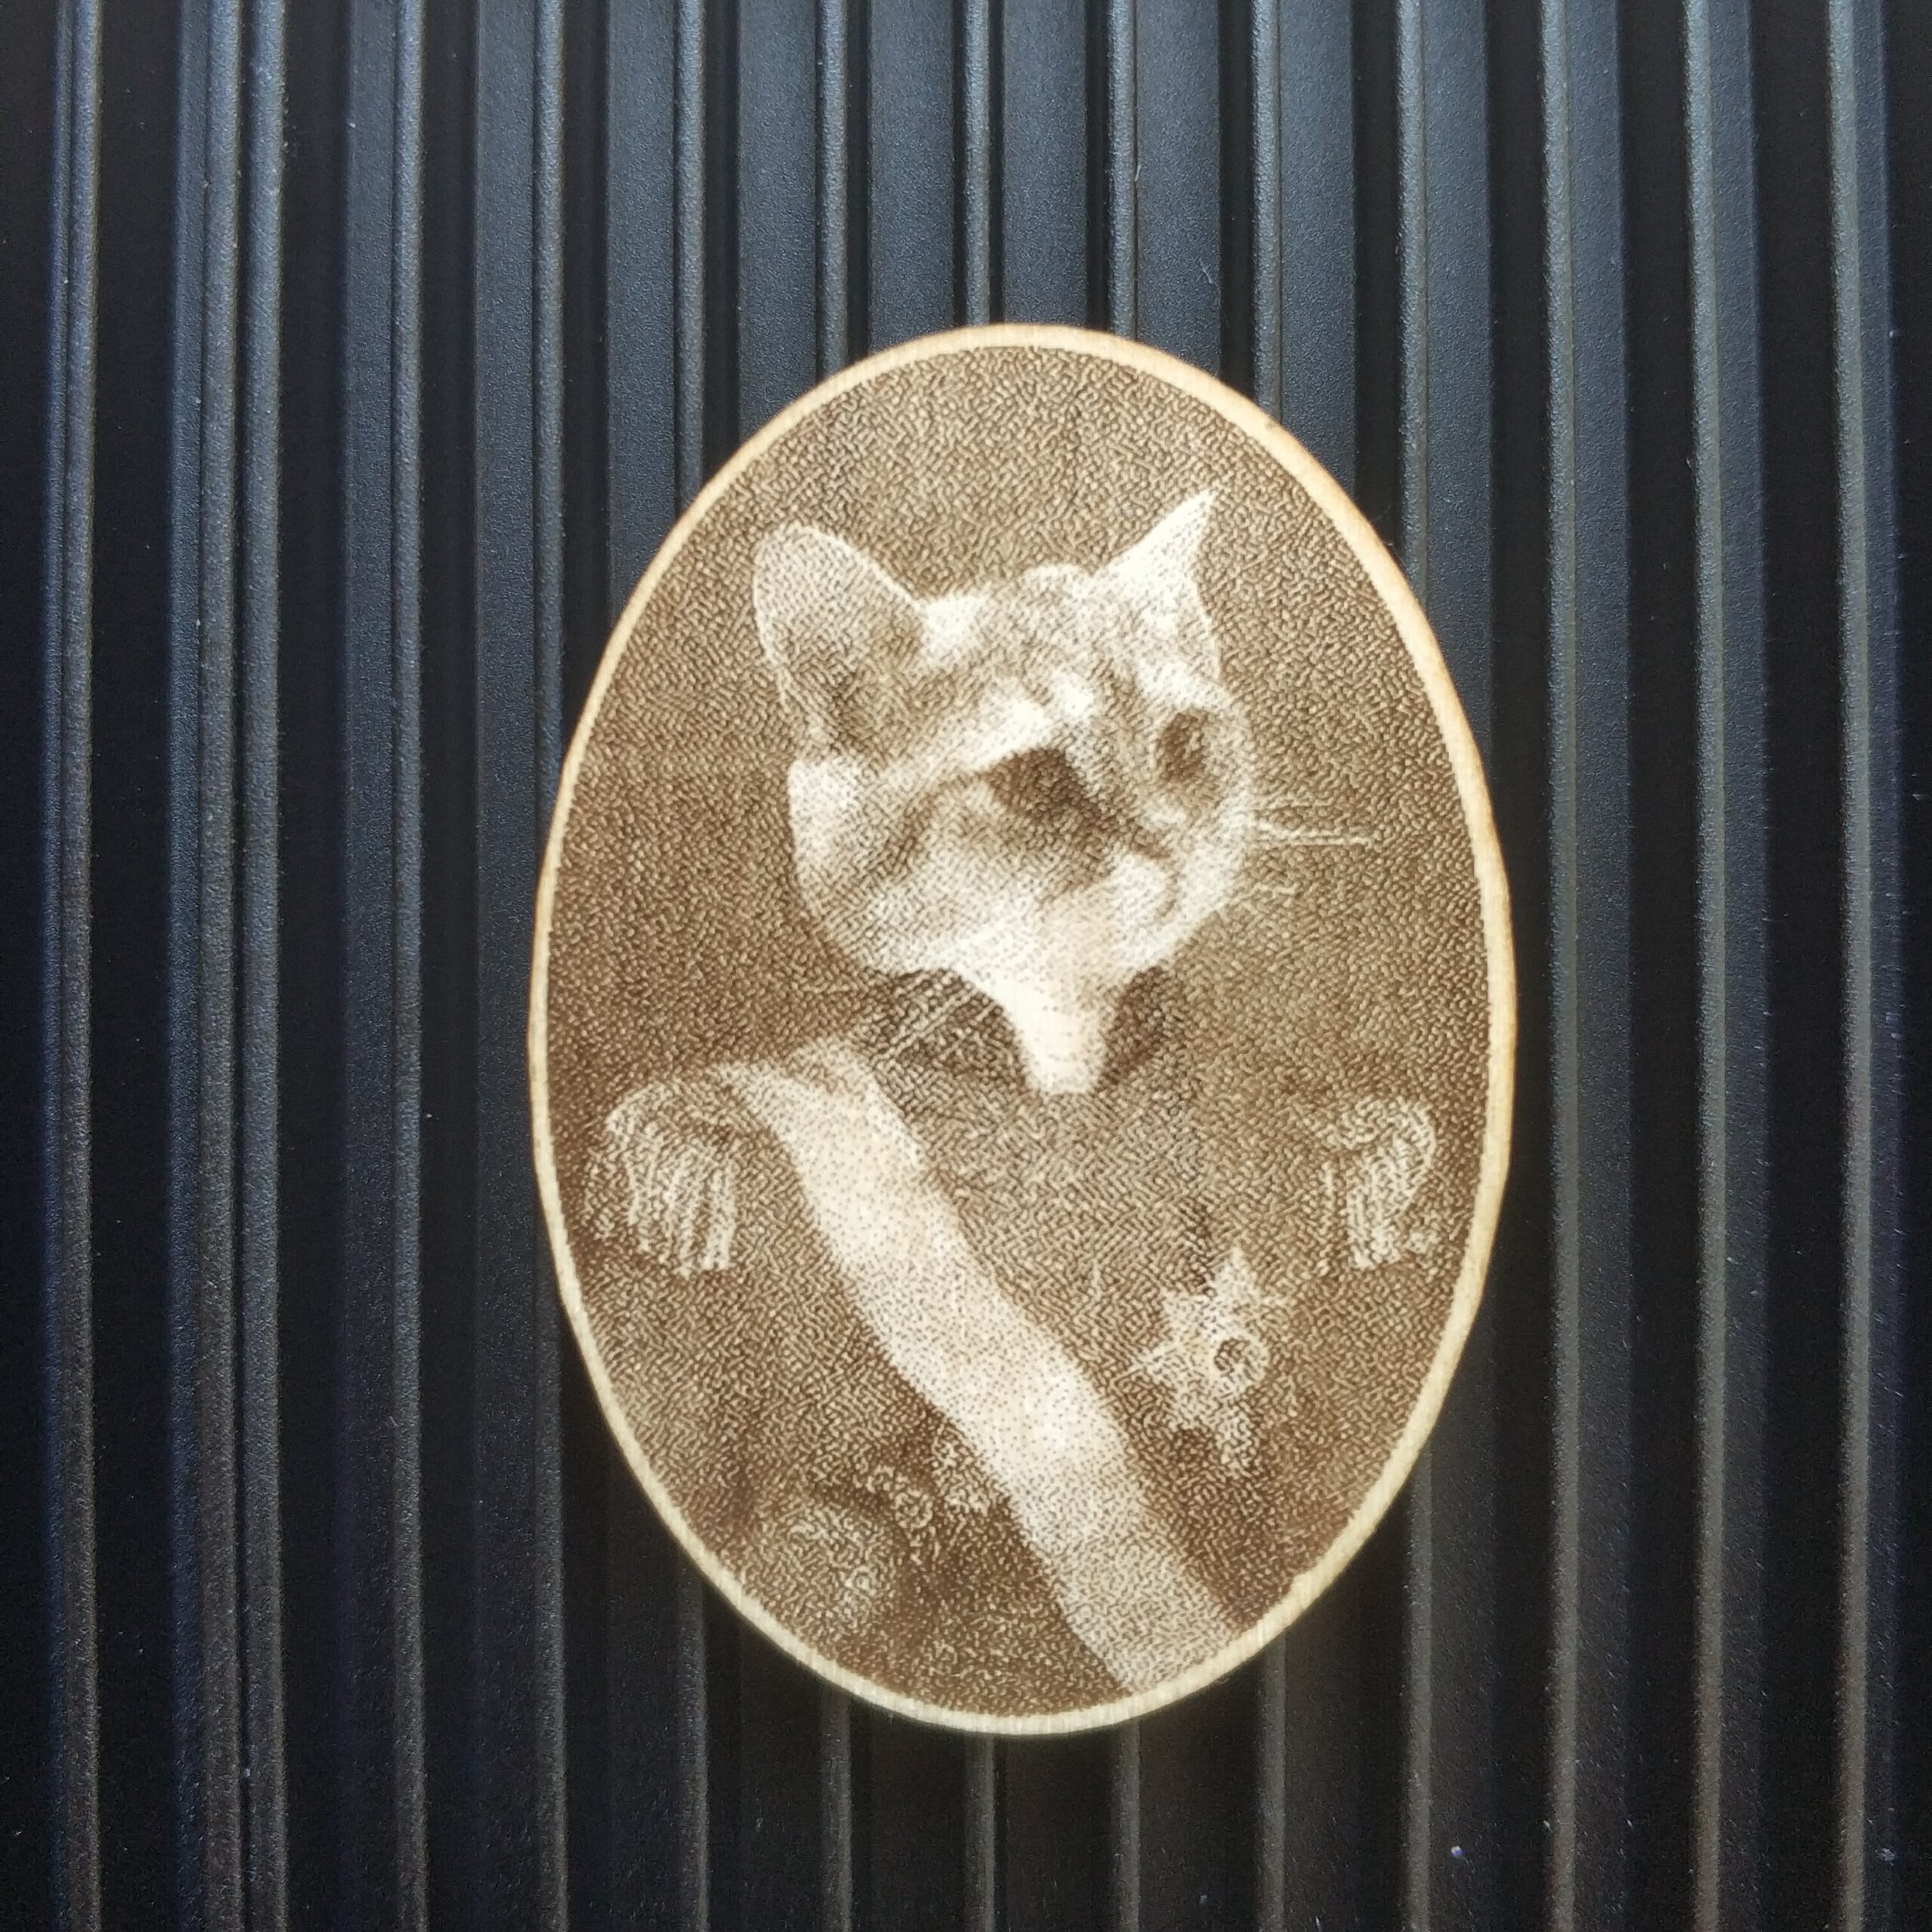
Portrait oval: 500mm/min, 2x with -0.7mm in Z

It only worked on the first attempt to cut through the 1.7mm thick plywood (probably poplar). In order to save time, I wanted to try two and only do 2 passes and increase the cutting speed. But that didn’t work and so I reduced the cutting speed in attempt three and increased the Z infeed a little.

If I re-laser the same material I will use the values from the last attempt, but with 400mm/min.

Engraving

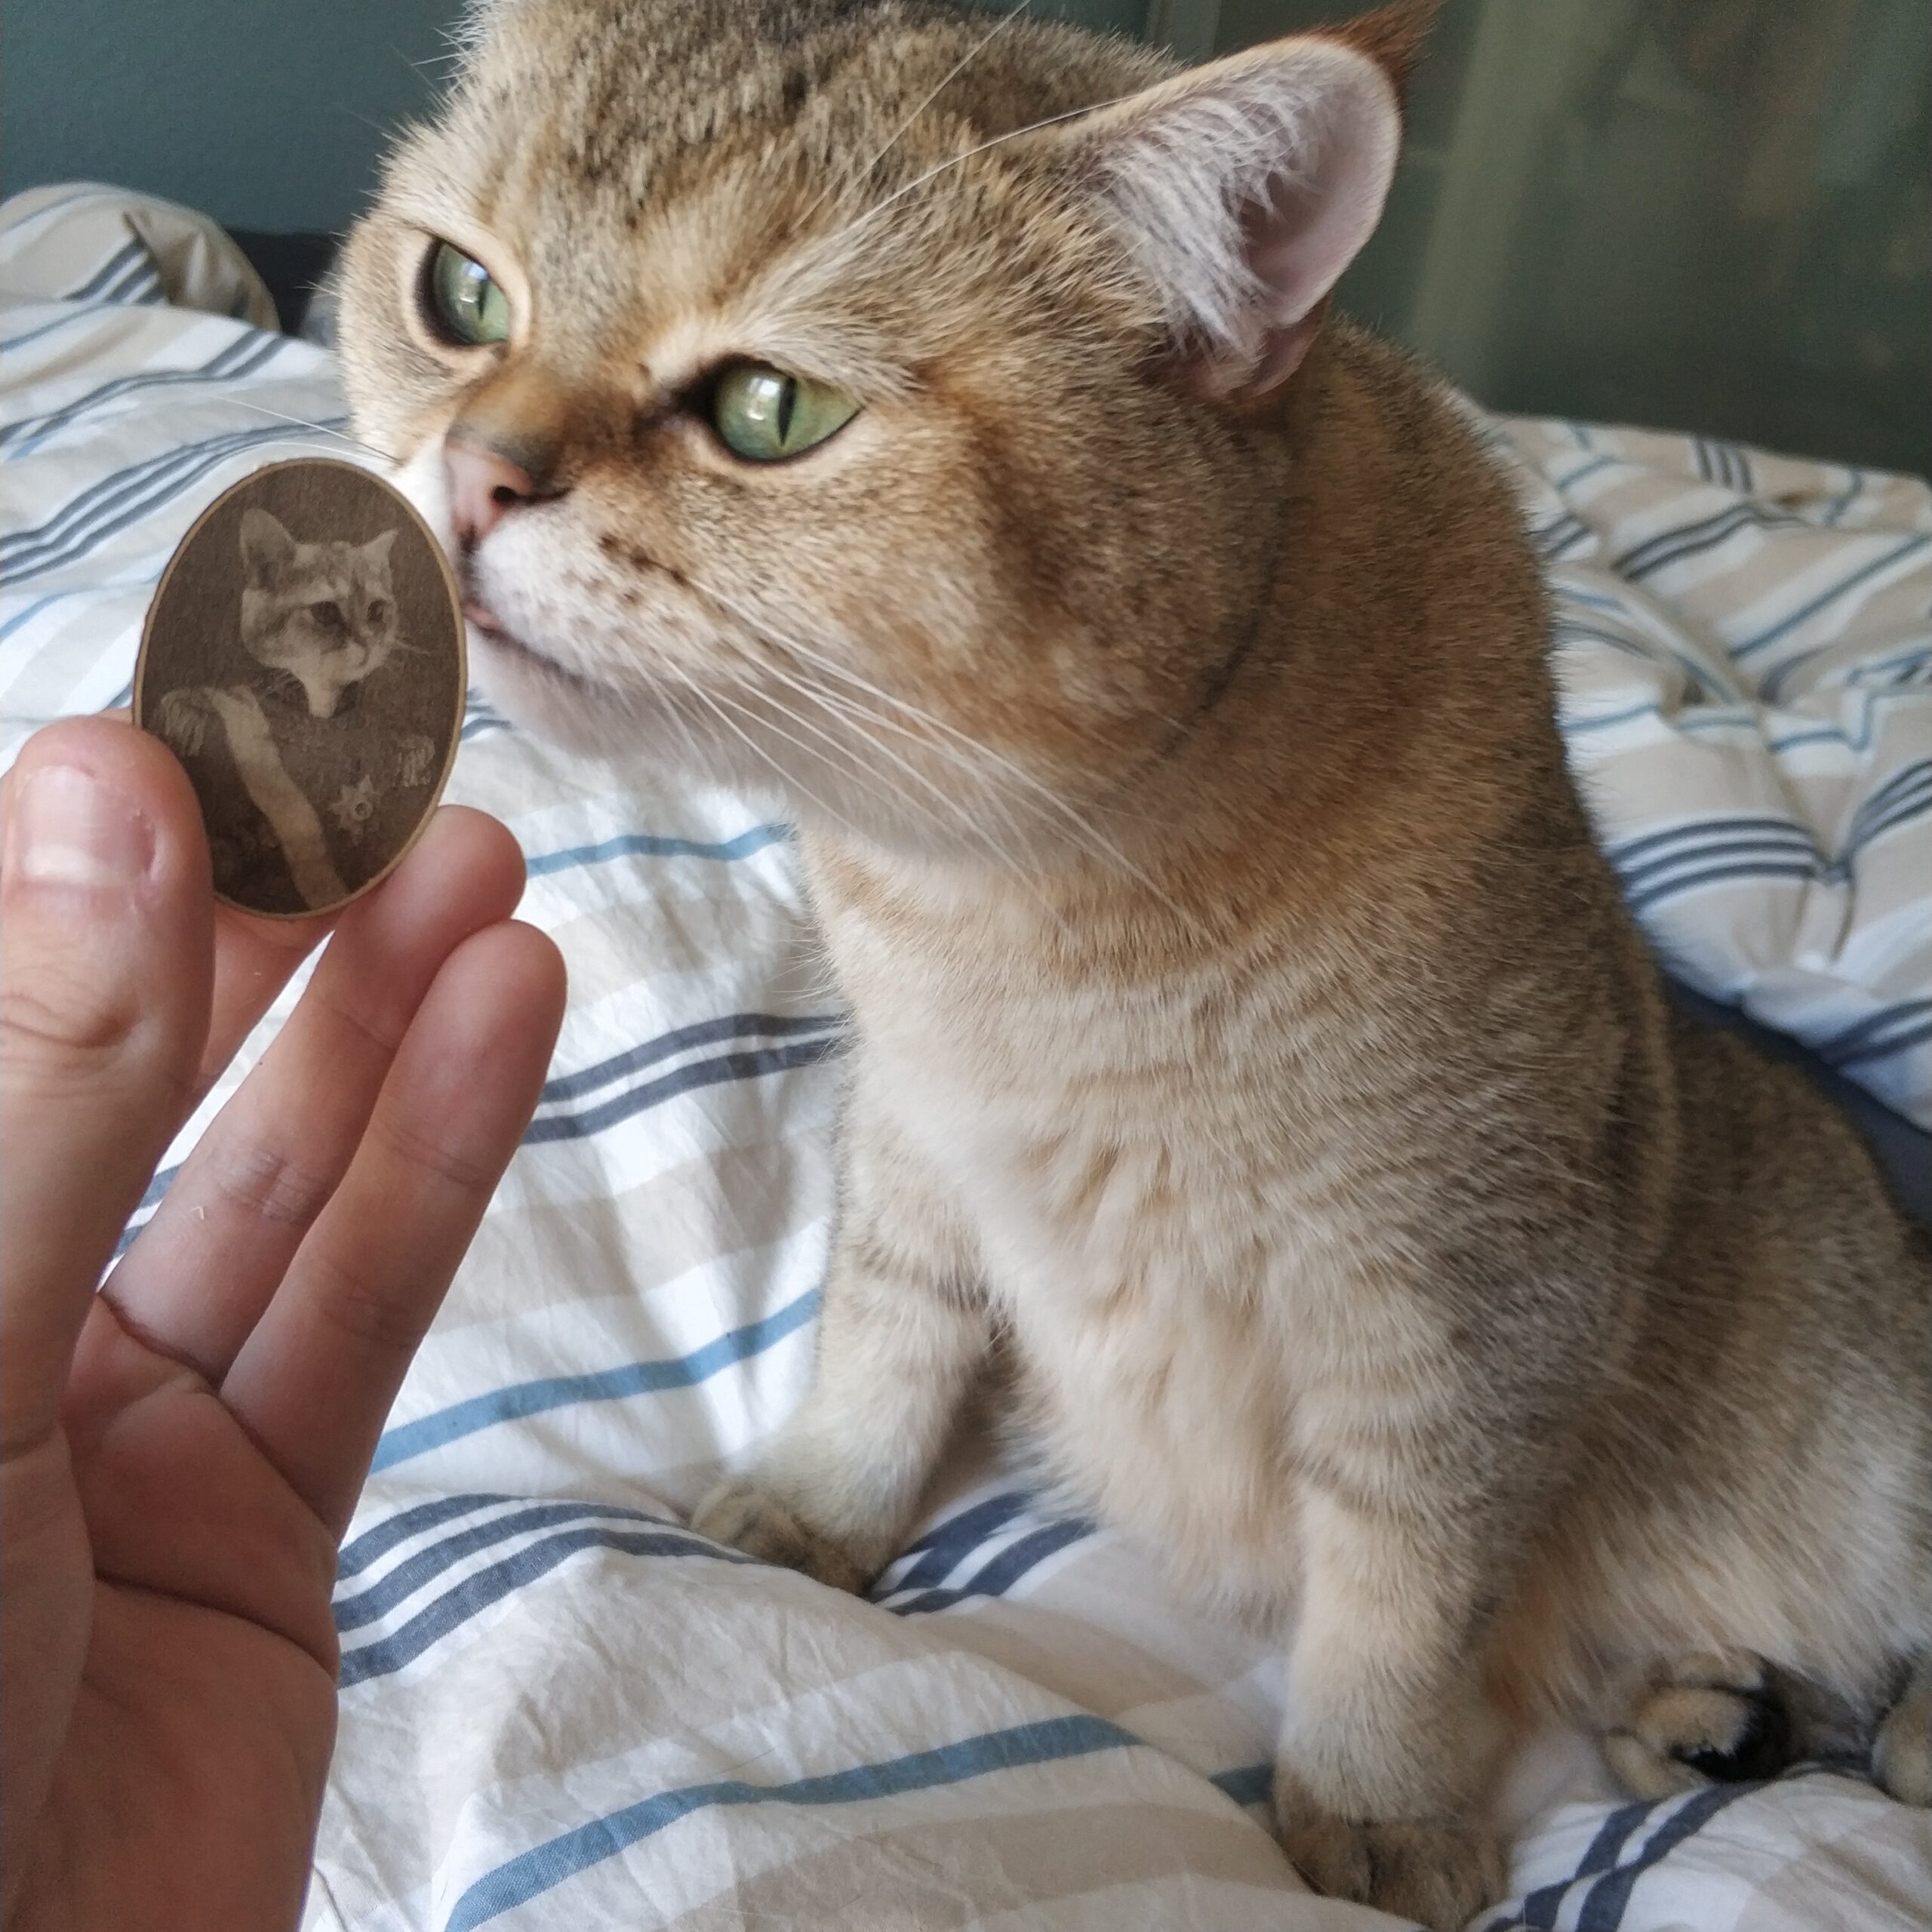
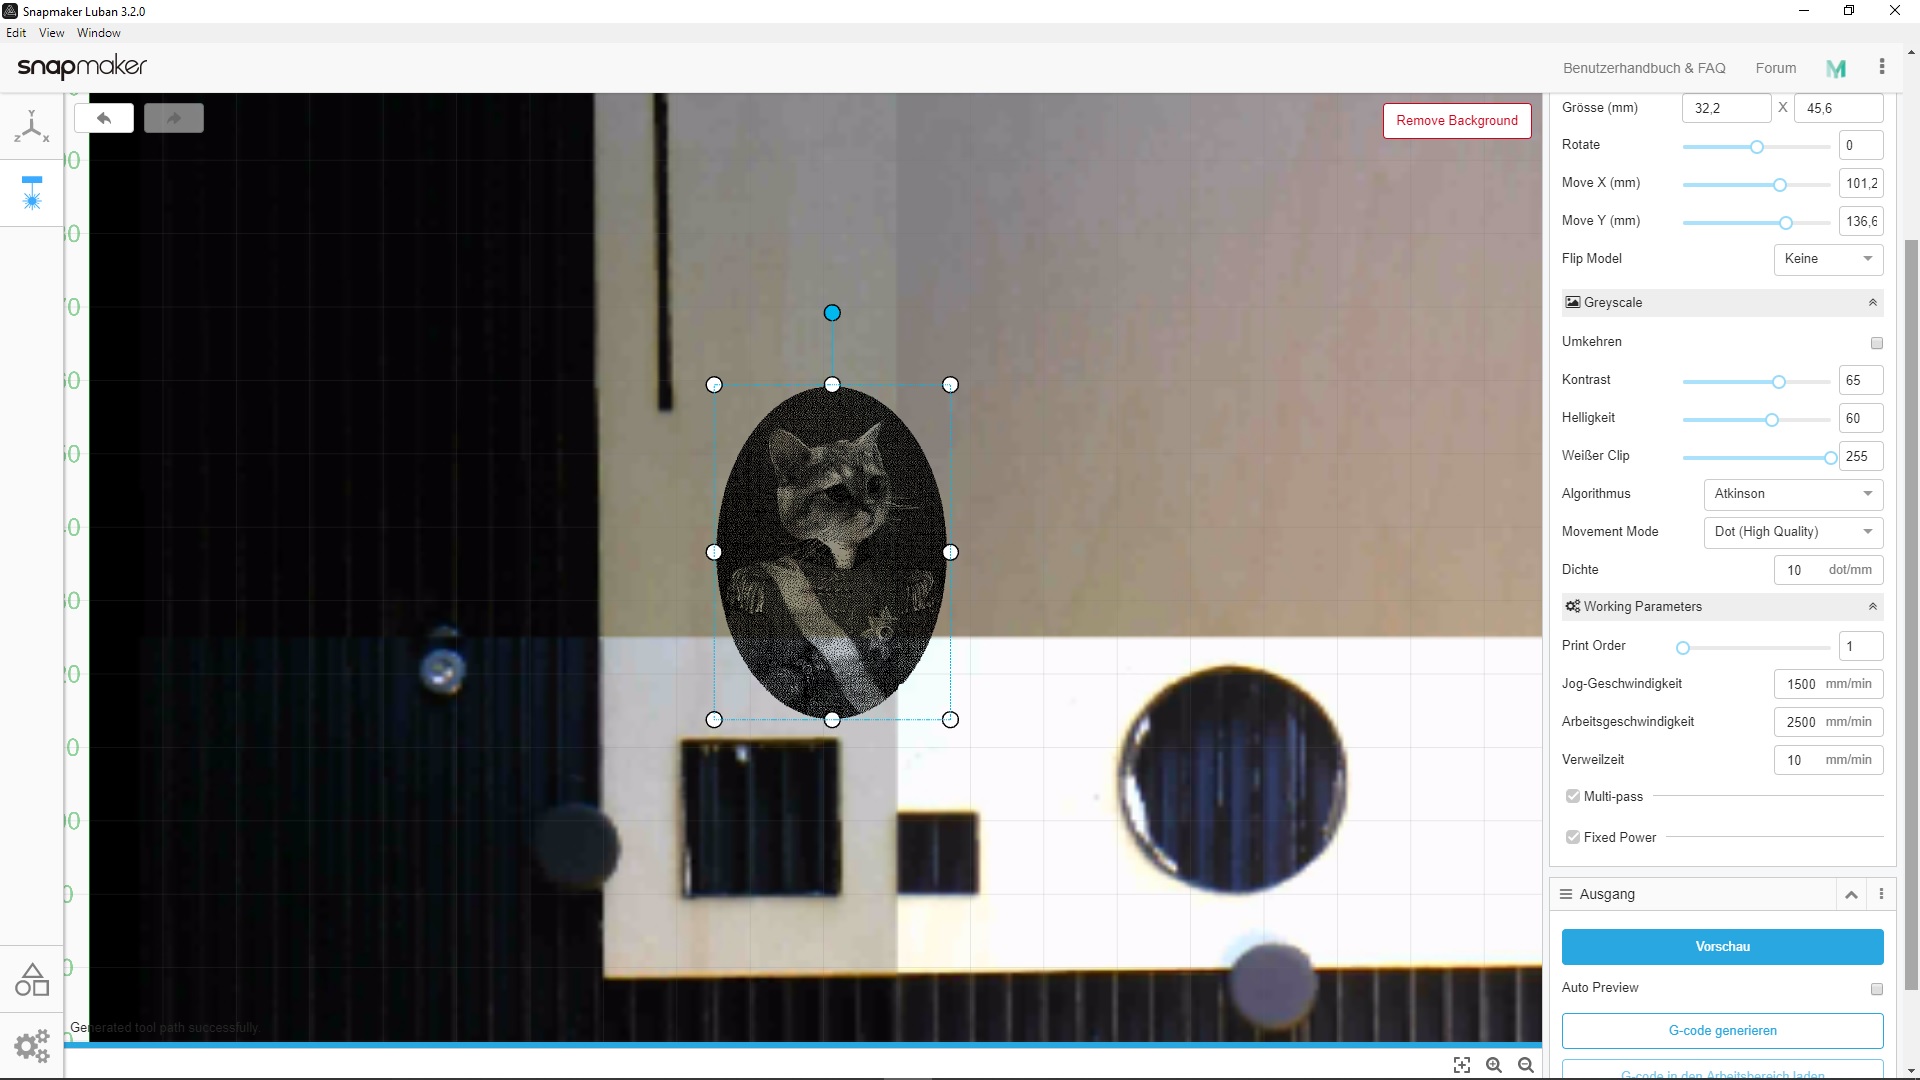
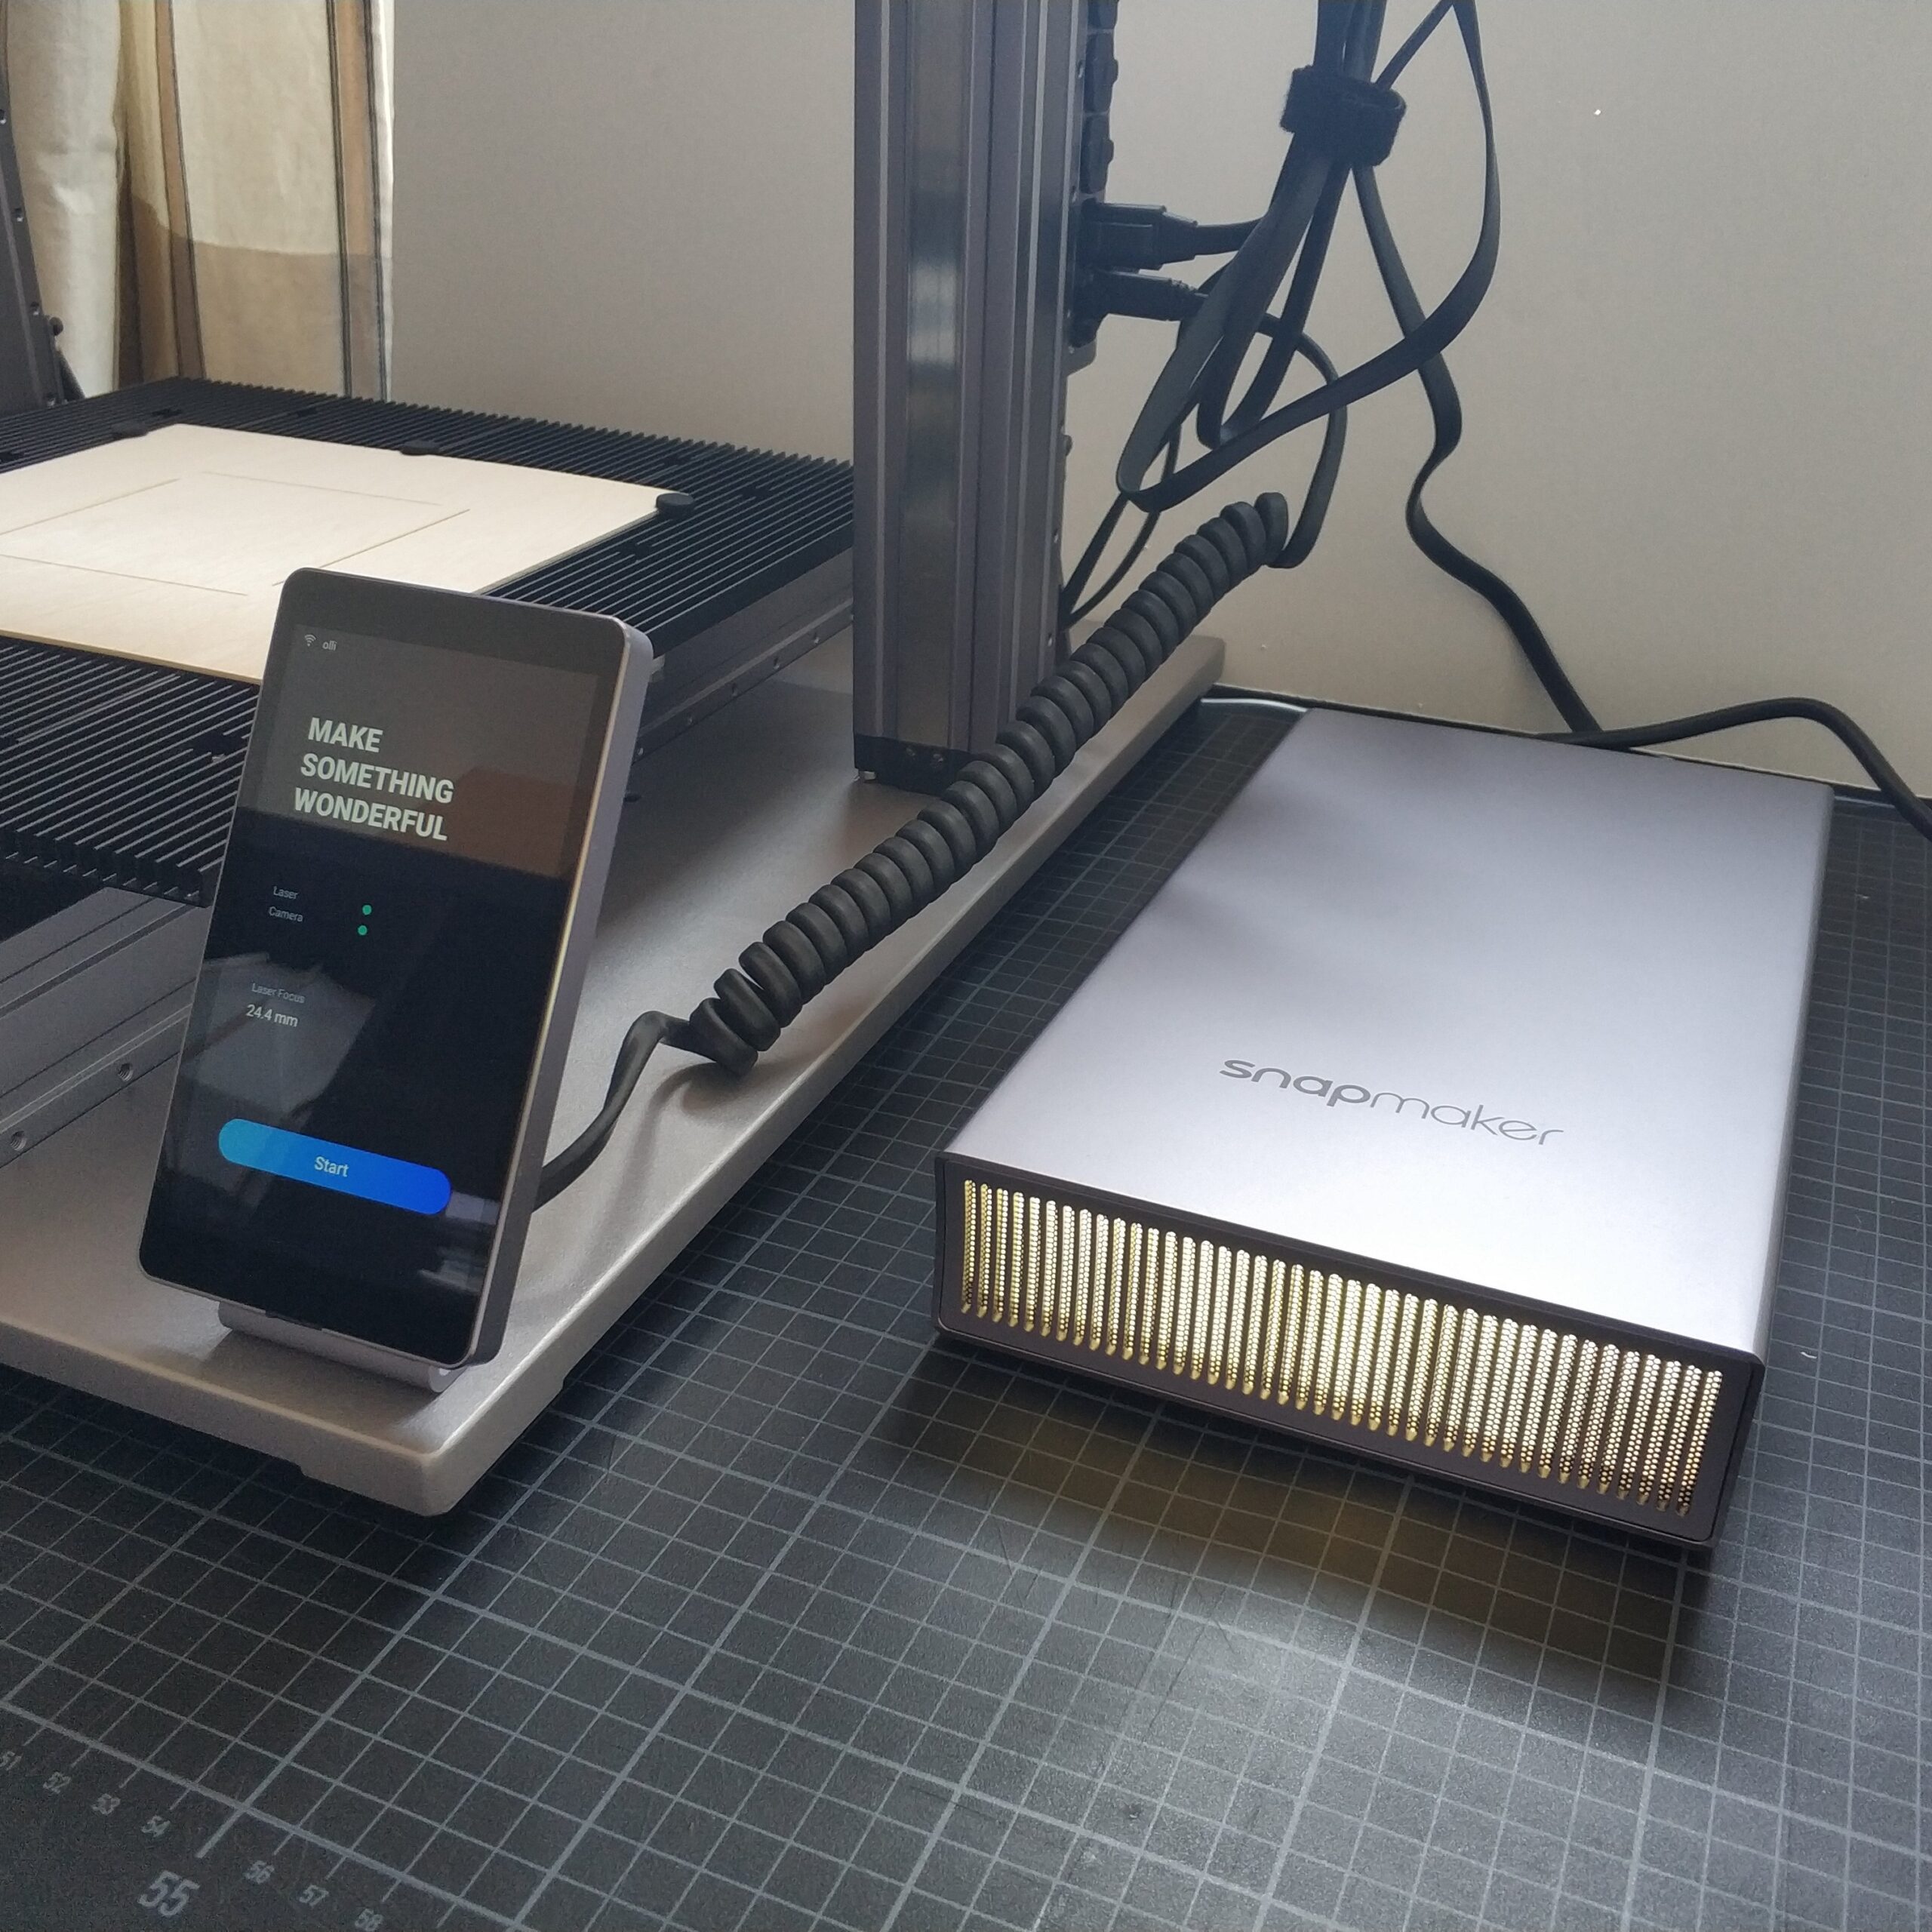
For the engraving, I chose the grayscale option and increased both contrast and brightness, as the image is quite dark and also poor in contrast. Since the image to be lasered is quite small, I increased the point density to 10 points / mm. With larger images, the point density should be reduced, as this unnecessarily increases the processing time and such a high level of detail is not necessary. I chose „Atkinson“ as the algorithm for image processing. I reduced the engraving power to 25%. In the very first engraving attempts, I gradually increased the output from 2%, to 5% and then to 15%. However, at 15% the results were unsatisfactory. So I started right away at 25% power, which apparently was just right.

The time for engraving was about 45 minutes.

Handwerkzeuge

Maschinen & Werkzeuge

Machines & Tools

Werkzeuge

Tools

Handwerkzeuge

Hand Tools

05.08.2020

Zwingen

Damit alles da bleibt wo es hingehört.

Qualitäts Zwingen aus „West Germany“ bezahlt mit DM.

Die Gripzangen aus China funktionieren auch ganz gut.

So that everything stays where it belongs.

Quality clamps from „West Germany“ paid for with DM.

The grip pliers from China also work quite well.

Fuchsschwanz, Metallsäge und Modellabausäge

Noch geht alles per Hand. Das ändert sich hoffentlich bald und ich habe mehr Zeit für andere Dinge.

Everything is still done by hand. Hopefully that will change soon and I have more time for other things.

Schraubstock

Ein Schraubstock ist ein muss für jede Werkstatt. Günstig gekauft vom Flohmarkt, tut er seit einiger Zeit seinen Dienst. Mit den Aluminium Profilen lassen sich auch weichere Materialien einspannen.

A vice is a must for every workshop. Purchased cheaply from the flea market, it has been serving for some time. The aluminum profiles can also be used to clamp softer materials.

Feilen

Hobel

Auf dem Flohmarkt für 50 cent gekauft. Vom Rost befreit und geschärft.

Bought at the flea market for 50 cents. Removed from rust and sharpened.

Tacker

Elektronik Werkzeuge

Maschinen & Werkzeuge

Machines & Tools

Werkzeuge

Tools

Elektronik Werkzeuge

Electronics Tools

05.08.2020

Ersa Lötkolben

Ein einfacher ungeregelter Lötkolben der Marke Ersa. Treuer Begleiter seit Jahren. Hat nur einmal fast das Haus abgebrannt.

Vorsicht heiß!

Dazu gehört natürlich auch das gute, giftige Blei Lötzinn. Angeblich verwendet die NASA auch noch Blei Lötzinn und meine Keller Werkstatt soll doch mit der NASA mit halten. 😉

A simple unregulated Ersa soldering iron. Loyal companion for years. Has almost burned the house down only once.

Caution hot!

Of course, this also includes the good, toxic lead solder. Allegedly NASA also uses lead solder and my basement workshop should keep up with NASA. 😉

Multimeter UT61C

Ein mittelpreisiges Multimeter mit netten Funktionen wie einer USB Schnittstelle zum Computer einem Thermometer und einem Aufsatz zum Testen von Transistoren.

Dank meiner Kompetenz im bereich der Elektronik ist es mir bisher nur zwei mal passiert, das ich die Sicherungen tauschen musste. 😉

A medium-priced multimeter with nice functions such as a USB interface to the computer, a thermometer and an attachment for testing transistors.

Thanks to my expertise in the field of electronics, it has only happened to me twice that I had to replace the fuses. 😉

Elektrowerkzeuge

Maschinen & Werkzeuge

Machines & Tools

Werkzeuge

Tools

Elektrowerkzeuge

Power Tools

05.08.2020

Makita DDF482RFJ Akkuschrauber - Wera Kraftform Kompakt 100 (05057460001)

Unter „etwas Reißen“ im Wörterbuch steht als Beispiel: „Mit Makita Werkzeug arbeiten“. Der Akkuschrauber tut was er soll und das mit „Wums!“. Der Schrauber hat noch oder vielleicht auch zum Glück Kohlebürsten und ist noch nicht Bushless. Ein Vergleich zwischen beiden Varianten wäre interessant. Im Hobby bereich sehen ich aber den Verschleiß der Kontakte als vernachlässigbar an.

Spaß macht auch das abgebildete Wera Bit/Inbusschlüssel Set. Fast alles was man braucht, im kompakt Packmaß. Mit Bit-Halter für den Akkuschrauber oder kleinem Schraubenzieher Bithalter oder Inbusschlüsseln zum selbst Hand Anlegen.

Billige Metall- und Holzbohrer erfüllen auch ihren Zweck.

Under „a little tearing“ in the dictionary is an example: „Working with Makita tools“. The cordless screwdriver does what it should and with „Wums!“. The screwdriver still has carbon brushes, or maybe luckily, and is not yet bushless. A comparison between the two variants would be interesting. In the hobby area, however, I see the wear and tear on the contacts as negligible.

The Wera bit / Allen key set shown is also fun. Almost everything you need in a compact pack size. With bit holder for the cordless screwdriver or a small screwdriver, bit holder or Allen key to put on by hand.

Cheap metal and wood drills also serve their purpose.

Alte Bohrmaschine mit Bohrständer und kleinem Schraubstock

Die Bohrmaschine als Fundstück aus der Werkstatt meines verstorbenen Opas und der geschenkte Bohrständer mit Schraubstock haben mir bisher immer treue Dienste geleistet.

Die in die Tage gekommene Bohrmaschine hat zwei Gänge und eine variable Geschwindigkeitseinstellung. Bohrt vermutlich wie am ersten Tag.

Nach gründlicher Reinigung und Öl Behandlung hat am Bohrständer alles wieder geflutscht wie es soll.

Der kleine aber wuchtige Schraubstock ist auch Gold wert und lässt sich für alles Mögliche missbrauchen.

„Auf die inneren Werte kommt es an.

The drill as a find from my late grandpa’s workshop and the gift drill stand with a vice have always served me faithfully.

The old drill has two gears and a variable speed setting. Probably drills like the first day.

After thorough cleaning and oil treatment, everything on the drill stand flopped as it should.

The small but massive vice is also worth its weight in gold and can be misused for a lot of other tasks.

„It’s the inner values that count.“

Proxxon Multitool mit Bohrständer und Kreuztisch

Das Multitools selbst hat des Öfteren die rettende Aufgabe durchgeführt.

Der Bohrständer hingegen hat meistens mehr Probleme verursacht als er gelöst hat. Alles was über die Größe eines Bierdeckels hinausgeht, macht das einspannen mit den Spannpratzen äußerst schwierig. Die Höhenverstellung sowie das Ein- und Ausspannen des Multitools ist wegen der kurzen Hebelarme sehr krampfig. Der Missbrauch als 3D Fräse ist durch die fehlende Spindel-öheneinstellung auch nicht möglich. Das Schwenken des Kopfes, um im Winkel löcher zu bohren wird durch die aufgeklebten Skalen und Breiten Striche darauf zum Glücksspiel. Zum Bohren von löchern im exakten Abständen ist der Ständer auch nicht zu gebrauchen da zu viel Spiel im ganzen System ist.

Fazit: Lineal, Bleistift und Augenmaß bringen einen weiter als der Bohrständer! 

The multitool itself has often performed the saving task.

The drill stand, on the other hand, usually caused more problems than it solved. Everything that goes beyond the size of a beer mat makes it extremely difficult to clamp with the clamps. The height adjustment and the clamping and unclamping of the multitool is very tough due to the short lever arms. Misuse as a 3D router is also not possible due to the missing spindle height adjustment. Swiveling the head to drill holes at an angle becomes a game of chance thanks to the glued-on scales and width lines. The stand cannot be used to drill holes at exact intervals because there is too much play in the entire system.

Conclusion: ruler, pencil and a sense of proportion will take you further than the drill stand!

Proxxon Multitool mit Netzteil

Kleiner, leichter und Handlicher. Ein zweites Multitool für feinere Arbeiten.

Mit Kaputtem Stecker zu mir gekommen und mit wenigen Arbeitsschritten wieder voll funktionsfähig gemacht.

Reparieren statt wegwerfen!

>>> Zum Projekt <<<

Smaller, lighter and more manageable. A second multitool for finer work.

It came to me with a broken plug and I made it fully functional again in just a few steps.

Repair instead of throwing away!

>>> To the project <<<

Messwerkzeuge

Maschinen & Werkzeuge

Machines & Tools

Werkzeuge

Tools

Messwerkzeuge

Measuring Tools

05.08.2020

Messschieber Stahllineale und Maßband

Die Messschieber funktionieren auch ohne Batterie und es lassen sich trotzdem 1/10 mm ablesen. Eins der Wichtigsten Werkzeuge für Entwickler.

Stahllineale sind robust und perfekt um mit Cuttern gerade Linien zu schneiden.

Das Maßband als ständiger Begleiter ist kompakt und ist für gröberes Messen im mm Bereich bis 2m ideal. Das Maßband ist älter und ist noch nicht so dick und unförmig durch billige Produktion und ausladende Kunststoff Sturzdämpfer, wie sie bei heutigen Maßbändern in den Baumärkten zu finden sind. 

The calipers also work without a battery and still read 1/10 mm. One of the most important tools for developers.

Steel rulers are robust and perfect for cutting straight lines with cutters.

The measuring tape as a constant companion is compact and is ideal for coarser measurements in the mm range up to 2m. The tape measure is older and is not yet as thick and misshapen due to cheap production and bulky plastic shock absorbers, as can be found in today’s tape measures in hardware stores.

Winkel, Parallelanschlag und Meterstab

Billige Winkel ein selbstgebauter Parallelanschlag und ein Meterstab.

Fraglich ob die Winkel tatsächlich 90° haben.

Der Parallelanschlag meines Opas ist aus einem alten Messschieber gebaut und konnte mal eine Rostkur gebrauchen.

Cheap angles, a self-made rip fence and a yardstick.

It is questionable whether the angles are actually 90 °.

The parallel stop of my grandpa is built from an old caliper and could use a rust cure.

Multimeter UT61C

Ein mittelpreisiges Multimeter mit netten Funktionen wie einer USB Schnittstelle zum Computer einem Thermometer und einem Aufsatz zum Testen von Transistoren.

Dank meiner Kompetenz im bereich der Elektronik ist es mir bisher nur zwei mal passiert, das ich die Sicherungen tauschen musste. 😉

A medium-priced multimeter with nice functions such as a USB interface to the computer, a thermometer and an attachment for testing transistors.

Thanks to my expertise in the field of electronics, it has only happened to me twice that I had to replace the fuses. 😉

Programme

Maschinen & Werkzeuge

Machines & Tools

Werkzeuge

Tools

Programme

Programms

05.08.2020

Rhino 5 - CAD

Rhino 5 ist ein NURBS (Non-uniform rational B-Splines) basiertes CAD (computer aided design) Programm. Mit ihm lassen sich 3D Körper erstellen die dann Beispielsweise mit dem 3D Drucker in die reale Welt gebracht werden können. Anders als beispielsweise Fusion 360, ein anderes CAD Programm, bestehen Körper nicht aus festen Körpern sonder werden aus Flächen und Kurven aufgebaut. Die stärke von Rhino liegt in der Bearbeitung amorphen und organischen Flächen. Große schwächen sind das komplizierte ändern von Dimensionen und Maßen an besteheneden Körpern sowie das einfügen von Radien auf Körpern.

Mit Erweiterungen wie Grasshopper lassen sich zum Beispiel generische Muster erzeugen und auf ein Objekt oder Flächen übertragen. 

Jeder der mit Rhino arbeiten will empfehle ich eine eigene individuelle Toolbox zu erstellen, die mit der mittleren Maustaste aufgerufen wird. Mauswege verkürzen sich dadurch dramatisch und man hat einen besseren workflow.

Rhino 5 is a NURBS (Non-uniform rational B-Splines) based CAD (computer aided design) program. It can be used to create 3D bodies which can then be brought into the real world with the 3D printer, for example. Unlike, for example, Fusion 360, another CAD program, bodies do not consist of solid bodies but are made up of surfaces and curves. Rhino’s strength lies in the processing of amorphous and organic surfaces. Major weaknesses are the complicated changing of dimensions and dimensions on existing bodies and the insertion of radii on bodies.

With extensions like Grasshopper, for example, generic patterns can be generated and transferred to an object or surfaces.

I recommend anyone who wants to work with Rhino to create their own individual toolbox, which is called up with the middle mouse button. Mouse paths are shortened dramatically and you have a better workflow.

Luban

Luban ist das Interface um Daten und Befehle and den Snapmaker zu schicken.

Bisher kann ich noch nicht viel zu dem Programm sagen, außer das es nicht so praktisch ist, das man für das Lasermodul und die CNC Fräse nur Bild-Dateien in das Programm laden kann und keine Vektor Formate. Das hat den großen Nachteil, das Pfade nur näherungsweise über den Bildprozessor ermittelt werden und somit Laser- oder Fräswege ungenau und ineffizient sind. Ich hoffe die Entwickler können diese Software Einschränkung schnell beheben.

Zu klären ist ob 3rd Party Software wie Cura oder Simplify3D die nur für den 3D Druck zuständig sind für vectorisierte Laser und Fräsbahnen missbraucht werden können.

Wie die meisten CNC gesteuert Maschinen arbeitet auch der Snapmaker mit G-Code. Wenn man einen Weg findet von einem Program erzeugten G-Code mit der entsprechenden maschinenspezifischen Befehlen and den Snapmaker zu übermitteln sind vektorisierte Pfade und die 3D Fräsbearbeitung kein Problem mehr.

Luban is the interface to send data and commands to the Snapmaker.

So far I can not say much about the program, except that it is not so practical that you can only load image files into the program for the laser module and the CNC milling machine and no vector formats. This has the major disadvantage that the paths are only approximately determined by the image processor and laser or milling paths are therefore imprecise and inefficient. I hope developers can quickly fix this software limitation.

It has to be clarified whether 3rd party software like Cura or Simplify3D which are only responsible for 3D printing can be misused for vectorized lasers and milling tracks.

Like most CNC controlled machines, the Snapmaker also works with G code. If you find a way to transmit G-Code generated by a program with the corresponding machine-specific commands to the Snapmaker, vectorized paths and 3D milling are no longer a problem.

Snapmaker 2.0 A350

Maschinen & Werkzeuge

Machines & Tools

Maschinen

Machines

Snapmaker 2.0 A350

Snapmaker 2.0 A350

05.08.2020

Der Snapmaker 2.0 A350 hat drei Aufsätze, die verschiedene Gestaltungsmöglichkeiten bieten. Dazu gehören ein 3D-Druck Kopf, ein Laser und eine Frässpindel.

Der 3D Druckkopf kann diverse Materialien mit einem Durchmesser von 1,75mm verarbeiten. Laut Hersteller kann PLA, ABS, Holz gefüllte Materialien sowie felxible Materialen gedruckt werden. Interessant wäre ob spezialkunstoffe wie Nylon oder CPE Kunstoffe verarbeitet werden können. Bei jenen Materialien muss ein Edelstahl „Nozzel“ verwendet werden um die Abnutzung zu reduzieren. Das große Bauvolumen von 35x35x35cm ermöglicht es sehr große Dinge zu drucken, was ganz neu Möglichkeiten bietet. Ein Nachteil ist das die Wärmeleistung des Druckbetts am geringsten bei dem größten Snapmaker A350 ist. Problematisch wird dies beim Verarbeiten von temperaturempfindlichen Materialien wie ABS. Ein Schutzgehäuse was zusätzlich beheizt ist könnte da Abhilfe schaffen.

Der Laserkopf hat einen Klasse 4 Laser mit einer Stärke von 1600mW verbaut. Gravur verschiedenster Materialien ist damit kein Problem. Mit der eingebauten Kamera lassen sich Bilder gut digital auf dem späteren Objekt vor platzieren. Material zu schneiden könnte schwieriger sein und muss noch getestet werden. Die Software die nur Bilder als Datei akzeptiert und keine vektorisierten Formate ist dabei neben der Leistung des Lasers wohl die größste Hürde.

Der Fräskopf wird eine riesige Sauerei machen und wird definitiv nicht ohne ein geeignetes Schutzgehäuse getestet. Das Verletzungspotential durch herrumfliegende Teile und zwei neugierige Katzen lassen nichts anderes zu. In meinen Projekten sind die ersten Entwürfe realisiert.

Abschließend ist nur zu sagen, das ich dankbar bin, in einer Zeit zu leben, in der CNC Machinen für privat Leute erschwinglich sind und es schaffen die Herstellungsmöglichkeiten auf ein ähnliches Niveau der Industrie zu heben. Ich hoffe das dies vielen Menschen helfen kann ein besseres leben führen zu können, dadurch das viel mehr Menschen ihre Ideen leichter umsetzen können. Im Sinne der Nachhaltigkeit hoffe ich auch das mehr kaputte Dinge repariert werden können oder bestehende Dinge erweitern oder verbessert werden können.

The Snapmaker 2.0 A350 has three attachments that offer different design options. This includes a 3D printing head, a laser and a milling spindle.

The 3D print head can process various materials with a diameter of 1.75mm. According to the manufacturer, PLA, ABS, wood-filled materials and flexible materials can be printed. It would be interesting whether special plastics such as nylon or CPE plastics can be processed. With these materials, a stainless steel „Nozzel“ must be used to reduce wear. The large construction volume of 35x35x35cm enables very large things to be printed, which offers brand new possibilities. One disadvantage is that the heat output of the print bed is the lowest with the largest Snapmaker A350. This becomes problematic when processing temperature-sensitive materials such as ABS. A protective housing that is additionally heated could remedy this.

The laser head has a class 4 laser with a strength of 1600mW installed. Engraving different materials is no problem. With the built-in camera, pictures can be placed digitally on the later object. Cutting material could be more difficult and needs to be tested. The software that only accepts images as a file and no vectorized formats is probably the biggest hurdle besides the performance of the laser.

The milling head will make a huge mess and will definitely not be tested without a suitable protective housing. The injury potential from flying parts and two curious cats do not allow anything else. The first drafts have been implemented in my projects.

In conclusion, I can only say that I am grateful to live in a time when CNC machines are affordable for private people and manage to raise the manufacturing possibilities to a similar level in the industry. I hope that this can help many people to lead a better life, so that many more people can implement their ideas more easily. In terms of sustainability, I also hope that more broken things can be repaired or existing things can be expanded or improved.

Galerie

Unboxing und Aufbau

Snapmaker 2.0 Schutzgehäuse

Projekte

Projects

Snapmaker 2.0 Schutzgehäuse

Snapmaker 2.0 enclosure

07.2020

Überblick

Overview
Geplantes Budget
planed budget
0
Fortschritt
progress

Design

Prepare

Build

Test

Done!

Maschienen und Werkzeuge
Machines and tools

Der Snapmaker hat verschiedene aufsätze, die verschiedene Gestaltungsmöglichkeiten bieten. Dazu gehören ein 3D-Druck Kopf, ein Laser und eine Frässpindel. Um mich und meine Katzen for den diversen gefahren besser zu schützen, habe ich ein Schutzgehäuse, aus 20x20mm Aluminiumprofilen und 2mm starken PC (Polycarbonat) Platten entworfen.

Das Schutzgehäuse soll neben herumfliegenden Spänen und Teilen auch die Geruchs- und Lärmbelästigung mindern. Das sogenannte „hotend“ des 3D-Druck Kopfes wird wie der Name vermuten lässt heiß und ist keine gute Kombination mit Fingern und insbesondere neugierigen Katzennasen und Pfoten. Gleiches gild auch für den Laser wobei hier eigentlich zusätzlich eine Schutzfolie im 450nm Bereich von Nöten wäre.

Im weiteren Verlauf, soll auch eine Absaugung mit Aktivkohlefilter, LED stripes und eine Halterung für 3D-Druck Spulen installiert werden.

The Snapmaker has different attachments that offer different design options. This includes a 3D printing head, a laser and a milling spindle. To better protect myself and my cats from the various hazards, I designed a protective housing made of 20x20mm aluminum profiles and 2mm thick PC (polycarbonate) plates.

In addition to flying chips and parts, the protective housing is also intended to reduce odor and noise pollution. The so-called „hotend“ of the 3D printing head gets hot, as the name suggests, and is not a good combination with fingers and especially curious cat noses and paws. The same applies to the laser, although a protective film in the 450nm range would actually be required here.

In the further course, a ventilation system with activated carbon filter, LED stripes and a holder for 3D printing coils will also be installed.

3D Model

3d model 3d model,blender,obj,3ds,maya,dxf,dae,stl,vrml,x3d,file by z9z1rc